
A fish walks into a bar. He looks at the bartender, puts his glass on the counter and says, “fillet.”
Magazine short lists of quintessential ‘Things Men Should Know’—like how to start a camp fire, throw a punch and connect jumper cables—include how to fillet a fish. The funny part is, a lot how-to guides of ‘Things Men Should Know’ say to clean the fish without gutting or gilling it. Yuk. That puts them in the ‘Don’t Know Nothin’ bracket for most Southeast Alaskans who bleed, gill and gut fish as soon as they’re caught.
Everyone fillets a little differently and everyone starts somewhere. If the first few fillets come out looking like a chainsaw massacre, no problem. You can use them for soup or can them. The best way to learn is to watch other people who are good at it then practice. If you end up with decent fillets and don’t waste any meat you’re styling.
Items that make it easy: A cooler you can clean fish on. A garden hose. Orange gloves like they wear on fishing boats. Sharp knife (8” white handled Dexter S-138 or something like it works well). Large bowl for the fillets. Small bowl for the meat scraps. Clean container for head, tail, backbone if you’re going to use them. 5 gallon bucket for what you’re going to throw out. Clean recycled dishcloths or towels.
If you do this in the driveway you won’t slime out the kitchen.
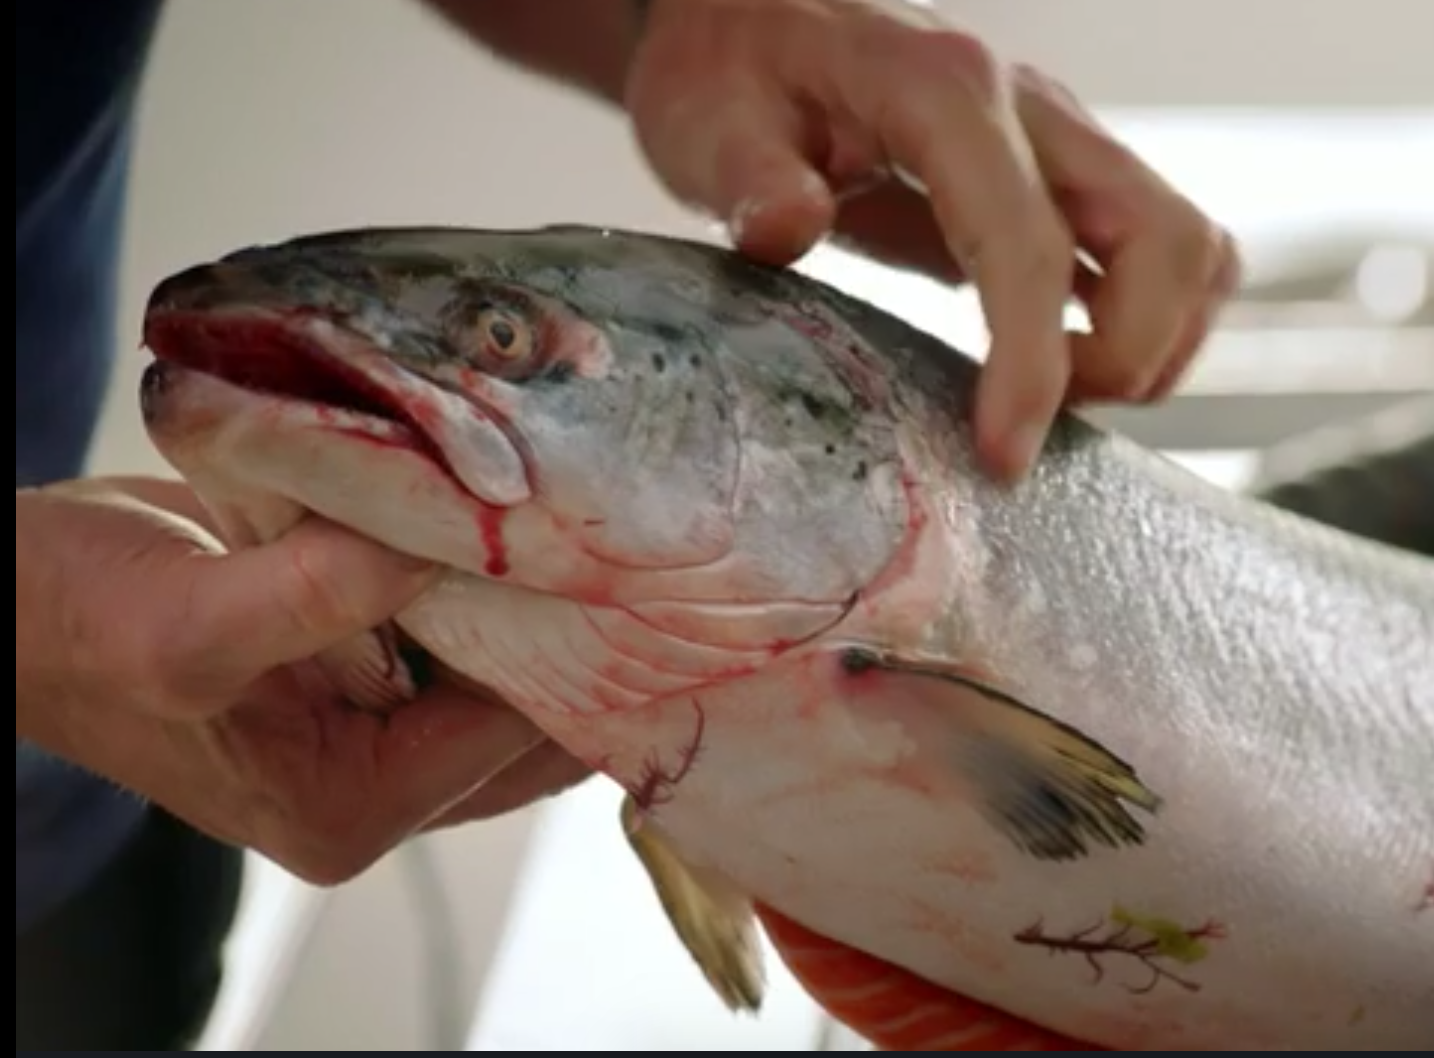
*Rinse off fish, inside and out, with the hose. Lay a towel on the cooler so the fish won’t slide. Put fish’s back towards you with head pointing to your left. Hold fish firmly with left hand.
*With knife angled towards fish head, cut straight across tail down to backbone. Cut up dorsal side, along the backbone, from tail to head. Cut straight across the collar. Turn knife edge towards tail and run it straight along the backbone in one smooth motion cutting through the ribs all the way to the tail. Lift off the fillet. Congratulate yourself.
*Flip the fish over, head still pointed left, belly towards you. Cut straight across along the collar from top to bottom. Angle knife edge towards the tail and run it straight along backbone to the tail. Now you have two fillets. Often the first one looks better than the second one.
*Trim off pelvic fins, slice knife gently under top of ribcage and work down towards the belly keeping as much meat on the fillet as you can. Fastidious filleters get little pliers and pull the pin bones. I’m not one of those. Trim off any bits of back bone or any thing that doesn’t belong. Leave the skin on.
If you take the time to clean the backbone, etc. you’ll end up with an extra half cup of soup or canning meat scraps per fish.
Freezing: Things that make it easy and keep fish longer. Small chest freezer (7 to 14 cubic feet.) Large baking sheets 17” by 25” like the commercial bakers use. Not required but good because they hold a lot of fish and have a lip around the edge so the fish don’t slide off the pan or drip slime in the freezer. Vacuum sealer and sealing bags. Cardboard boxes, newspapers.

A bulletproof method for freezing fish is to glaze it first like a lot of the canneries do. Cut fillets into the sizes you want, place them skin down on baking sheet and freeze them hard over night. Put meat scraps in 1 ½ cup glops on pan to freeze. In the morning get your vacuum sealer and bags ready. Put a gallon or two of cold water in a large bowl. Add half a cup of honey to make a more viscous glaze. Quickly dip each piece of salmon in the bowl, twice. The frozen fish freezes the glaze around itself sealing out oxygen. Shrink wrap the pieces quickly. Put them in boxes. Lay newspaper between layers of fish. The idea is to protect the fish inside boxes so the vacuum bags don’t get compromised, this keeps your fish from getting freezer burned. They’ll hold in the freezer until spring.

For the head, tails and back bones, think about not throwing them away. The United Nations Food and Agriculture Organization has pointed out that fish heads are a substantial part of the fish, have a lot of meat on them and may have more Omega 3’s (the good fat) and micro nutrients than fillets do. There are soup and soup base recipes for heads and there’s a growing market for heads overseas. Collars, cut off and smoked, often go for ten dollars a pound or more. They are very good barbequed. Backbones, if you’re canning, are an excellent source of calcium. They crumble into bits during the canning process. Chichi Wang of ‘Serious Eats’ gives a recipe for fried fish back bones. Small stuff you can’t use for anything is worth freezing to use for crab bait. You can always return what’s left to the water or dig it into the garden after the bears are asleep.


